How To Format a Blog Post in 6 Simple Steps
We recommend WordPress with Hostinger for most people because it’s easy to set up and it’s easy for beginners to use. Get started with Hostinger today for just $2.99 per month.
Formatting a blog post is easy enough to do. But when you’re trying to piece together a lot of information from across the internet and other sources, it can feel a lot more complicated than it is. In this guide, we’re breaking down the best way to format any blog post in six simple steps, so you can confidently write posts that are optimized for search and easy for your visitors to read through.
The 3 Best Blogging Platforms for Formatting a Blog Post
When you’re formatting a blog post, it helps a lot if you’re already using a good blogging platform. It’s even better if that platform has an easy-to-use interface, drafting features, and access to plugins for checking SEO-approved formatting, like Yoast.
Here are our favorite blogging platforms from the many options available to you:
- WordPress with Hostinger – Best Overall
- Wix – Best for Beginners Building a Professional Blog
- Squarespace – Best Blog Builder for Artists and Designers
To find out the pros and cons of each platform in detail and more information about blogging, read our full post reviewing the best blogging platforms and blog sites.
Format a Blog Post in 6 Easy Steps
We’ve broken down the process of properly formatting a blog post into six simple steps. Follow our guide and your posts will be formatted well for SEO and general readability every time.
- Get Started with Hostinger
- Do SEO Keyword Research
- Write Your Title
- Write Your Headings
- Finalize Your Outline
- Add Images
For this tutorial, we’ll be using WordPress as our blogging platform, as it’s the most popular choice on the market (and likely to be what you’re already using). Best of all, Hostinger gives you an easy path to taking care of web hosting on the cheap while also getting you up and running on WordPress if you haven’t set up your blog already. You can get started with Hostinger today for just $2.99 per month.
Step 1: Get Started with Hostinger
Before you actually format a blog post, it’s a good idea to get signed up with a blogging platform so you have somewhere to post your content and you can access some of the tools in this guide.
Since we’ve oriented this guide around using WordPress, let’s show you how to get that set up through our favorite WordPress hosting provider, Hostinger.
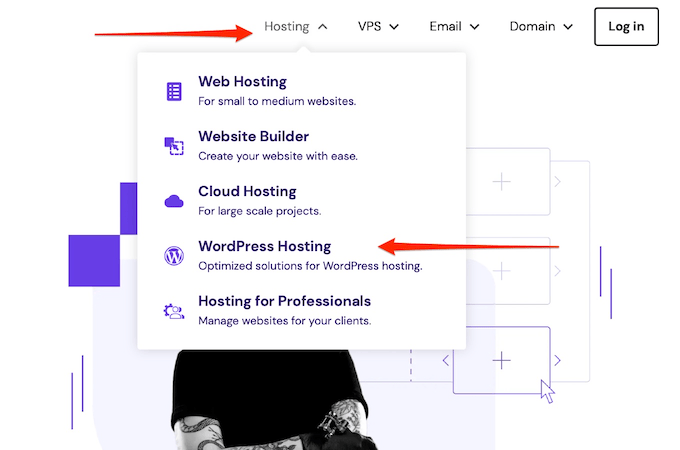
Head over to Hostinger’s home page, go to Hosting in the top menu, then click WordPress Hosting.
Scroll down until you find the list of plans, then choose the best one for you. I would recommend starting on the WordPress Starter plan because you get a free domain and a lot of really versatile features, plus you can always upgrade in the future.
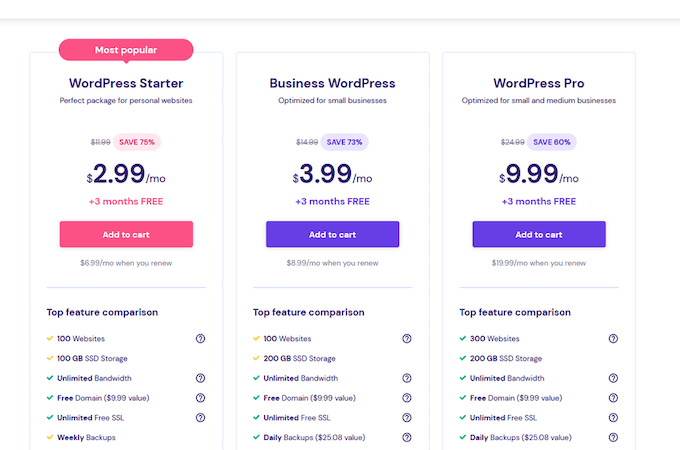
Once you’ve determined your plan, click Add to cart.
You’ll then need to select your hosting term period. The longer your plan’s commitment, the lower the monthly rate will be. Just keep in mind that you’ll have to pay the total upfront. That means if you opt for a three-year commitment at $2.99, you’ll pay $107.64 for your hosting plan at checkout.
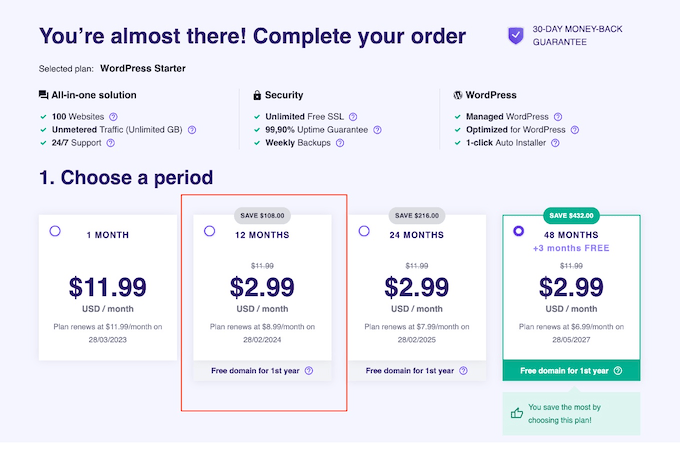
For new bloggers, 12 months is a good place to start. That way, you’re not committed to two more years if you abandon this blogging project after one year, but you have enough time to both get value from the hosting plan price and determine success. Fortunately, at the time of this writing, Hostinger’s monthly rate for WordPress hosting stays the same whether you choose a one, two, or three-year contract.
From there, you just need to create your account by filling in your details, then enter your payment information to finish checkout.
Once you’ve completed the purchase, you can then go to your dashboard to view your new account. This will come with a free domain that we’ll choose later and WordPress integrated automatically into your new site.
Step 2: Do SEO Keyword Research
SEO consideration should be a big part of your blog content planning in general.
If you want your post to rank on Google, you’ll need to include SEO keywords in your title, intro, headings, and within your text, so doing some research before you start writing your post will really help you identify what types of headings you’ll need to use and how you’ll structure your post.
SEO research can be a little bit complicated, so we’re not going to break it down in depth in this post (you can read our detailed SEO guide if you need help), but there are lots of free tools that can help you identify words in your niche that are high in search volume but low in traffic.
I’d recommend using either Ubersuggest or Semrush’s free version if you can’t afford a paid subscription to an SEO tool. There’s also a tool called Yoast SEO that is extremely useful for editing and placing SEO keywords. It’s a plugin that you can add to WordPress, and when you upload your blog post as a draft, it can scan the post and let you know how and where your SEO can be improved.
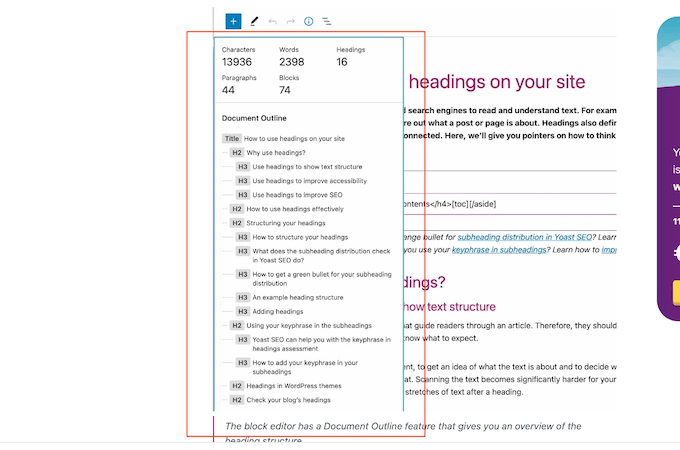
This includes things like telling you if you have used your keyword enough times (or too much) in the content, if your headings are using the right words, and how to structure certain aspects of your language to improve visibility in search results.
This is one of the reasons I suggest you get signed up with Hostinger with WordPress before you format your blog post, because you’ll get access to Yoast at no extra charge as part of your Hostinger WordPress hosting plan.
Step 3: Write Your Title
The first thing your readers will see will be your blog post title.
Now, this may be a little controversial. Although I’m including this as the third step in this guide, you can honestly write your headline at any point, including as the last step. Sometimes, it helps to get a clear view of your blog post as a whole before settling on a headline.
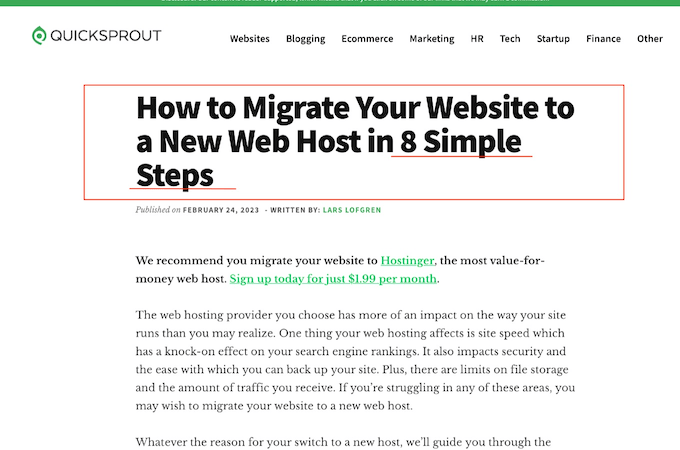
Whenever you choose to tackle this step, your headline should be fewer than 60 characters long and needs to be relevant to the post while hinting at the value the reader will get from reading. A good way to do this is to use rhetorical questions or to use a headline with numbers that teases a list in the post. For example:
- Is Natural Deodorant a Scam?
- The 5 Fastest Ways to Cook a Potato
Rhetorical questions pique curiosity and cause readers to open and read the blog post to find the answer. With lists, people like numbers because they are comforting and definitive and lists are easy to read.
Studies have found that odd numbers in headlines also get better results and click-through rates, so if you can create a list with an odd number, you’ll boost your chances of writing a great headline.
Step 4: Write Your Headings
The key markers for your post that will help readers navigate the content and plan which sections will be valuable to them are headings and subheadings.
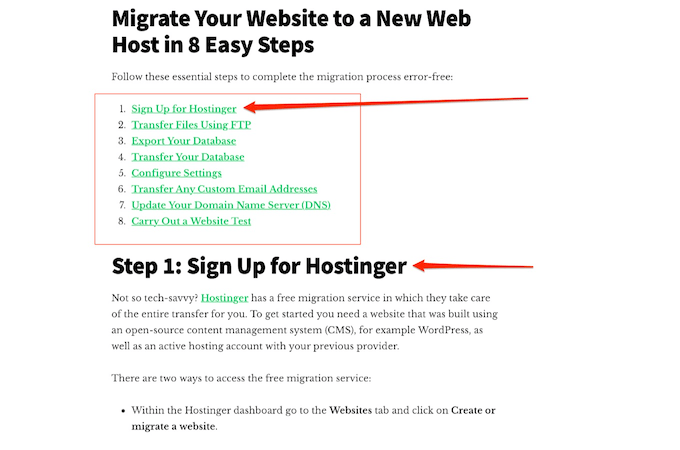
A good example of headings in this very post is each numbered step. You can clearly see what each section is going to be about, which makes it easy for you to follow the guide and also come back to a specific section if needed.
Your headings should ideally use your SEO keywords, and you want them to be concise and to the point.
A lot of the time, it also will make sense to create a table of contents if your post is long, and you can use your headings to structure it (and link to the relevant sections in the post).
That can help guide your thinking about the post’s overall structure and potential headings. What would make sense if you saw it in a table of contents? What is going to clearly tell the reader what each section is about?
For main headings, keep them high level. You don’t want to create a heading for every single little thing. Instead, you want your main headings (usually formatted as H2 headings in word processors like Google Docs and blog post editors in platforms like WordPress) to feel like chapter titles.
Then, for smaller breakdowns within a section, you can use H3 headings, known as subheadings. This just makes it easier for posts to be scanned by your audience and helps them move through the post easily, especially if you’re covering a lot of unique aspects of a topic, tips, or other items.
Step 5: Finalize Your Outline
Once you have your headings planned, you can start fleshing out your outline. Before your first heading, you should write an intro to the post. This should be short, between one or two paragraphs. The first sentence needs to grab the reader’s attention like your title does and introduce them to the rest of the post.
After each heading, write your main body content for each section. Try to keep this digestible and easy to scan—between 3 or 4 paragraphs is a good rule. Break up large stretches of text with things like bullet points or images (more on this in a bit) when you can. Don’t go overboard with this but remember that it can be tough for people to just read a wall of text, so breaking things up visually with subheadings, bullet points, visual elements, or numbered lists can help.
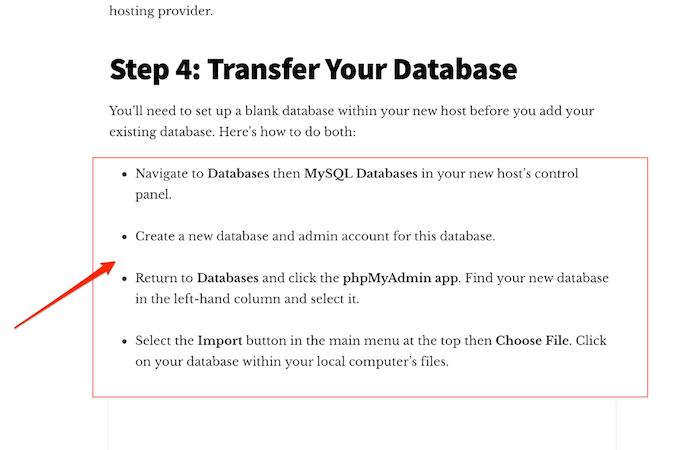
At the end of your blog post, you should write a short conclusion, summarizing the post and giving the reader a call-to-action or a parting thought that closes the post with a flourish. Some posts won’t include this and you don’t have to either, but it’s a good opportunity to include relevant links to your other blog posts or to invite readers to do something.
For example, if you’re writing a blog post about the pros and cons of hiring your moving vehicle rental company, you might end the post with a quick summary and then an invitation to book a van.
Your heading for this can just be something like “Conclusion” or “Summary”, but that can look a little unprofessional and simplistic. In this post, for example, you can see that we use the heading “Final Thoughts.” It sounds better and still lets the reader know that the post is coming to a conclusion.
Step 6: Add Images
When you’re formatting a blog post, you may want to add images or screenshots that support what you’re writing about.
These can be a little messy, because it’s not always easy to make images look good in WordPress. You’ll want to be mindful of the theme you’re using and how blog posts display on your WordPress site, so you can get a good feel for the right width and proportions for images to use.
You can get creative with the images you use, but make sure they’re relevant to the written content. You should have one main image for your blog post that appears above or just under your title called a featured image, which can also be used alongside your headline for blog category pages, on web pages, or within your blogroll.
The other images in your post should also be relevant and valuable to the content, but can also be used to break up long stretches of text. You’ll notice at Quick Sprout when we use images, they’re usually graphs, charts, or screenshots that help you understand the content of the blog post. We don’t use random stock images because they’re just that: generic. They usually don’t add much value compared to custom illustrations, screenshots, and original photos.
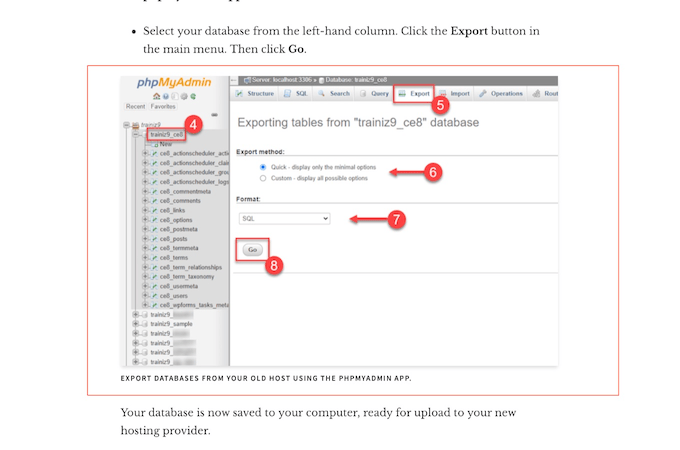
For example, if you are doing a step-by-step guide and you’re giving instructions on how to sign up for a piece of software, you could include screenshots for each key step in the process with annotations to help users follow along and complete the steps.
You can also embed videos where it makes sense, but be aware that these can really slow down your site’s loading speed. Just try not to go overboard and weigh your site down to the point where it takes more than three seconds to load.
Final Thoughts About Formatting a Blog Post
If you use the steps we’ve outlined in this guide, every post you write should be easy for readers to scan and optimized for search. Of course, remember that every post is different and it’s perfectly fine to get creative. As long as you keep the focus on making it simple for readers to move through your post and find valuable content quickly, everything else will fall into place.